Last Day of the 31 Day Challenge today! This challenge was a huge learning experience for me. I tried so many new techniques and ideas - and although I need to practice and improve on most of them, its a start. Also, I am fairly new at blogging and this challenge was really like jumping in at the deep end. The challenge is over now but I will be putting my new found knowledge to good use, hopefully!
For today's challenge, I decided to recreate the fish tail manicure done by the lovely Lucie! Of course, its difficult to match her beautiful manicure but this is my humble, little attempt!
For these nails, I used a base of Claire's Cosmetics Blue Mirror and then alternated diagonal brush strokes to form the fishtail with Boots 17 Style Slave and a special edition Barry M glittery pink, BLE2012. In my experience, the things to remember for this technique is to wait a minute between each diagonal stripe to let it dry a bit before the second. Also, that these nails take some time to dry since the multiple brush strokes make it a bit thick. The fish tail nails look absolutely lovely and I can't wait to try them again with other color combinations!
Showing posts with label 31DC2013. Show all posts
Tuesday, 1 October 2013
Monday, 30 September 2013
31DC2013: Day Thirty - Inspired by a Tutorial
There are so many wonderful tutorials available to help with various nail art techniques today. Some of these have really helped me so much. I really appreciate all the wonderful bloggers who have shared their experience and expertise with us. I have used a few tutorials to do some of my challenge manicures. I used various tutorials to do my water marble and galaxy nails, although I didn't follow one tutorial for them - it was more a mix of what I learnt by watching various video tutorials. I also used tutorials to do my Flowers, polka dots and animal print manicures.
My nails today are inspired by a dry needle marble tutorial. These nails are not hard to do and are quite unusual, unstructured and fun.
I used two colours for my nails - Essence My Fortune Cookie and Color Club Ulterior Motive. I painted one thick stripe with the gold, then one stripe with the glittery pink and again a third stripe with the gold. I used a needle to zig zag lines across the nails. I then added topcoat and the rhinestones.
My nails today are inspired by a dry needle marble tutorial. These nails are not hard to do and are quite unusual, unstructured and fun.
I used two colours for my nails - Essence My Fortune Cookie and Color Club Ulterior Motive. I painted one thick stripe with the gold, then one stripe with the glittery pink and again a third stripe with the gold. I used a needle to zig zag lines across the nails. I then added topcoat and the rhinestones.
Sunday, 29 September 2013
31DC2013: Day Twenty-Nine - Inspired by the Supernatural
Posting my nails inspired by the supernatural very late today. It took me a long time to decide on how to do this manicure - I'm not really into anything related to this subject. It seemed fascinating when I was very young and although it still is, I just haven't really been interested enough to read up about it.
I started with Barry M Gelly in Lychee. Then I stamped with Konad Black from the image plates QA8 for the skull and crossbones, the Gals Fairy Set GA36 for the single skull image, Konad M94 for the bat image, which I stamped multiple times and Konad M91 for the black cat. I finished with the Rimmel Pro Matte Finish Topcoat.
Saturday, 28 September 2013
31DC2013: Day Twenty-Eight - Inspired by a Flag
My Manicure for day twenty-eight of the challenge is inspired by the racing flag.
For this manicure, I used Rimmel Riviera Red, Barry M Black and Matt White. The chequered flag on the middle finger is stamped with Konad Black from the image plate Konad M93. The champagne bubbles on the ring finger are stamped with Essie Penny Talk from the messy mansion image plate MM02. The silver rhinestones on the red nails represent the chrome fittings on a shiny, new red car!
Friday, 27 September 2013
31DC2013: Day Twenty-Seven - Inspired by Artwork
My manicure today was inspired by this beautiful painting by Vincent Van Gogh - Starry Night Over the Rhone.
For the three nails with the rhinestones, I used OPI Sea You In Hollywood. On the accent nails, I used horizontal brush strokes to paint with Barry M Blackberry, Cyan Blue, before adding the other details with NYC Lexington Yellow and Konad Yellow. I think this was definitely the hardest bit of the challenge. If I do this challenge again, I definitely need to visit some art galleries for inspiration!
Thursday, 26 September 2013
31DC2013: Day Twenty-Six - Inspired by a Pattern
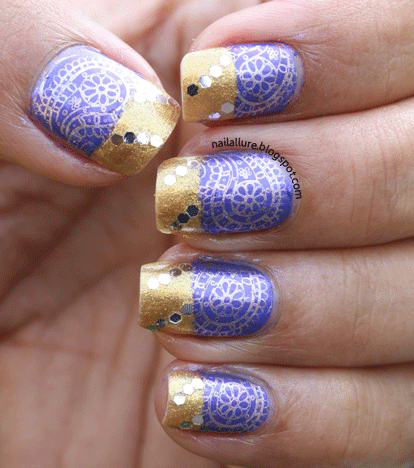
For this part of the challenge, I knew I had to go with a sari pattern! There is such a large variety of patterns to choose from and the colours are so vibrant and gorgeous. I chose this beautiful silk sari -
And here are the nails, inspired by the pattern ...
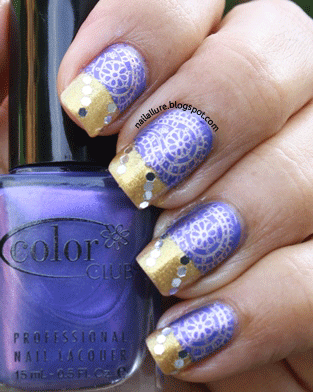
For this manicure, I applied base coat and once dry, I taped off the ends with the french manicure guides. Then I painted the top part of the nail with Color Club Secret Agent. I stamped the paisley image from the plate QA59 with Essie Penny Talk. I painted the tips with Essence My Fortune Cookie and added the hex glitter.
This is my first Essence Polish. Its a glittery, yellow gold, which was exactly what I wanted. I got it on a recent trip to Belgium since I had heard about this brand but never tried it. Right after I got it though, I found out that Essence is coming to Wilkinson's in the UK soon. I believe its already available in selected stores. Check out the Essence Facebook page for details, if you are interested and live in the UK.
And here are the nails, inspired by the pattern ...
For this manicure, I applied base coat and once dry, I taped off the ends with the french manicure guides. Then I painted the top part of the nail with Color Club Secret Agent. I stamped the paisley image from the plate QA59 with Essie Penny Talk. I painted the tips with Essence My Fortune Cookie and added the hex glitter.
This is my first Essence Polish. Its a glittery, yellow gold, which was exactly what I wanted. I got it on a recent trip to Belgium since I had heard about this brand but never tried it. Right after I got it though, I found out that Essence is coming to Wilkinson's in the UK soon. I believe its already available in selected stores. Check out the Essence Facebook page for details, if you are interested and live in the UK.
Wednesday, 25 September 2013
31DC2013: Day Twenty-Five - Inspired by Fashion
For my fashion inspired nails, I chose a dress by Balenciaga, AW12.
I started with a base of Barry M Matt White and stamped with Konad Black with the image plate, Konad M57. I then added a layer of top coat. I was planning to use scotch tape to section off the nails diagonally before painting with the second colour. But I was too impatient to wait for the nails to dry - Scotch tape manis can end really badly if the nails are not completely dry! So I used a nail art brush to draw diagonal lines across the nails before filling them in with NYC Midnight in Amethyst.
Tuesday, 24 September 2013
31DC2013: Day Twenty-Four - Inspired by a Book
My nails for day Twenty-Four of the challenge are inspired by the book, Darkly Dreaming Dexter by Jeff Lindsay. Since I have been hooked on to the TV series for the last few years and its coming to an end this week, this manicure seemed appropriate for this part of the challenge!
For this manicure, I used Sally Hansen Wet Cement for the grey and Barry M Black. I used Sally Hansen Insta Dri Rapid Red and the image plate Konad M21 for the "Blood Spatter". I sponged a gradient on the black nails with Maybelline Deep Red.
In other non-challenge related news, I had the privilege of attending the Olympia Beauty Show in London on Sunday, the 22nd of Sept, 2013. I also had the pleasure of meeting up with three wonderful ladies, Lucie of Lucy's Stash, Vic of Glowstars and Dimpal of Crazy Polishes. Please see the photo reports of the day posted by Lucie and Vic. This was my first experience of the Beauty Show so I wasn't sure what to expect. It was definitely a sort of nail polish wonderland with row upon row of different brands of nail polish, among lots of other beauty products. Lesson learnt for the next show - save up before the show to splurge in the next one!!
For this manicure, I used Sally Hansen Wet Cement for the grey and Barry M Black. I used Sally Hansen Insta Dri Rapid Red and the image plate Konad M21 for the "Blood Spatter". I sponged a gradient on the black nails with Maybelline Deep Red.
In other non-challenge related news, I had the privilege of attending the Olympia Beauty Show in London on Sunday, the 22nd of Sept, 2013. I also had the pleasure of meeting up with three wonderful ladies, Lucie of Lucy's Stash, Vic of Glowstars and Dimpal of Crazy Polishes. Please see the photo reports of the day posted by Lucie and Vic. This was my first experience of the Beauty Show so I wasn't sure what to expect. It was definitely a sort of nail polish wonderland with row upon row of different brands of nail polish, among lots of other beauty products. Lesson learnt for the next show - save up before the show to splurge in the next one!!
Monday, 23 September 2013
31DC2013: Day Twenty-Three - Inspired by a Movie
For day twenty-three of the challenge, my nails are inspired by one of my favourite movies, "My Fair Lady"
I think these are the toughest few days in the challenge. Its really got me thinking as to what music, movies and books can inspire my nail art. I am quite happy with these nails. I did the flowers because she was a flower girl, the vowels and phonics she had to practice over cups of tea and a glimpse of the pattern from her dress for her first outing as a lady!
For these nails, I used a base of Barry M Matt White. I wrote the vowels with the black Barry M Nail Art Pen. I used scotch tape for the pattern on the ring finger. The cup of tea is stamped from the Pueen 30 image plate with Konad Black. The steam was drawn with the black Barry M Nail Art Pen. The flowers were stamped from the MoYou London XL Pro Plate 10 with Sally Hansen Insta Dri Flashy Fuschia.
I think these are the toughest few days in the challenge. Its really got me thinking as to what music, movies and books can inspire my nail art. I am quite happy with these nails. I did the flowers because she was a flower girl, the vowels and phonics she had to practice over cups of tea and a glimpse of the pattern from her dress for her first outing as a lady!
For these nails, I used a base of Barry M Matt White. I wrote the vowels with the black Barry M Nail Art Pen. I used scotch tape for the pattern on the ring finger. The cup of tea is stamped from the Pueen 30 image plate with Konad Black. The steam was drawn with the black Barry M Nail Art Pen. The flowers were stamped from the MoYou London XL Pro Plate 10 with Sally Hansen Insta Dri Flashy Fuschia.
Sunday, 22 September 2013
31DC2013: Day Twenty-Two - Inspired by a Song
The days are getting shorter and colder - its almost autumn. That and this lovely song by Ed Sheeran inspired this manicure - Autumn Leaves - it just seemed so appropriate for this time of the year!
I used NYC Pure Air as the base. Then I sponged on some 2True Shade 9, a glittery bronze, on the tips. I stamped one nail with the music notes and bird image from the plate Pueen47. The stamping is with Essie Penny Talk and Konad Black. The stars stamping is from the image plate QA15. I free handed the different coloured leaves with a fine nail art brush, using Rimmel Camouflage, Konad Yellow and Essie Penny Talk. I definitely need to improve on my free hand leaves but its a start ...!
Labels:
2True,
31 Day Challenge 2013,
31DC2013,
Essie,
Misc Image Plates,
NYC,
Pueen,
Pueen 47,
QA15,
Rimmel
Saturday, 21 September 2013
31DC2013: Day Twenty-One - Inspired by a Colour
This manicure is inspired by the colour Pink! I love the combination of the glittery pink with black.
For these nails, I used a special edition Barry M glittery pink, BLE2012 - . Its stamped with Konad Black and Pueen 47. On the accent finger I used Revlon Black Star and added two pink rhinestones from MoYou London.
Friday, 20 September 2013
31DC2013: Day Twenty - Water Marble
For these nails, I used Sally Hansen White Tip and Rimmel Pro My Denim. I added the hex glitter to some of the nails. There are many good tutorials on the internet on how to water marble nails.
Although, I have to say that in spite of the tutorials I watched for this - and some of them are really good, I had a hard time with the water marble. After many attempts I did manage to learn how to place my nails at such an angle in the water that I get some sort of a pattern on them - and believe me, that's harder than it looks! But I also noticed that some of the nail polishes disperse very differently than others in the water. The glittery/frosty ones don't seem to do very well but even the regular creme/glossy ones don't all behave the same. I did use filtered water so I don't know what the difference was. I would appreciate any tips from anyone out there who's good at water marble. Though it will be a while before I try this technique again!
But the good news is, we are two-thirds of the way through the challenge. On to the next one!
Thursday, 19 September 2013
31DC2013: Day Nineteen - Galaxies
For the galaxy nails, I used Barry M Navy, Sally Hansen Frutti Petutie, OPI Sea You in Hollywood and Barry M Matt White. I painted my nails with Barry M Navy and then sponged on the white, pink and a lighter blue. Added the white dots for stars with a dotting tool and finished with a glitter topcoat, Max Factor Shimmer Finish.
I am not sure I would have tried the Galaxy nails, if it hadn't been for this challenge - not anytime soon, anyway. But I am so glad I did. Though I hope to do better in my next attempt but these are not hard to do since you can easily cover up mistakes and there is no right or wrong really. They are colourful and you top them with glitter - what's not to love!
Wednesday, 18 September 2013
31DC2013: Day Eighteen - Half Moons
Half Moons for Day eighteen of the 31 Day Challenge. For this manicure I used Rimmel Purple Reign as the base polish. After my nails were dry, I used hole reinforcers (like the ones in the link) to tape off the half moons at the base of the nails. Then I sponged on a gradient with the purple and Max Factor Ivory.
Lastly, I added the hexagonal nail glitter to outline each half moon with a toothpick. You can use a little clear polish to pick up the glitter on to the toothpick. Then lay it on the still tacky nail (painted with a coat of clear polish in this case) where you want to place it. Finished off with a coat of top coat.
I really like these nails - they look so festive. They are definitely good for special occasions or the festival season!
Tuesday, 17 September 2013
31DC2013: Day Seventeen - Glitter
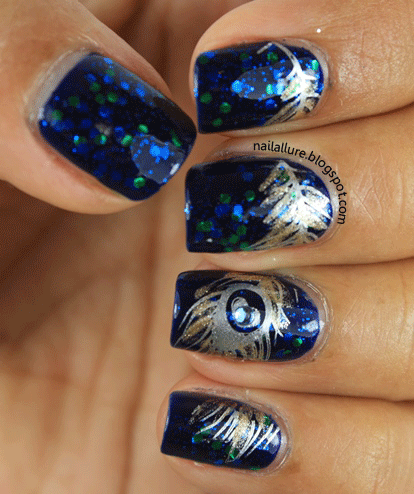
For this manicure, I used 2 coats of Barry M Navy as the base. Then two coats of Sally Hansen Salon Manicure Mermaid's Tale glitter polish. I then stamped four fingers with the peacock feather from the image plate Nailz Craze NC01 with Essie No Place Like Chrome. I added in some more strokes of glittery gold with Max Factor Ivory on to the feather. Added a rhinestone on the ring finger and finished it off with top coat.
I love the colours in this glitter polish - the combination of the blue and green glitter is beautiful. The green and blue combination reminded me of peacock feathers, which is why I decided to stamp that image. The silver stamping looks striking against the dark base. I loved this manicure - couldn't stop looking at my nails!!
Monday, 16 September 2013
31DC2013: Day Sixteen - Tribal Print
For the tribal print nails, I painted the entire nail with NYC Lexington Yellow. Then I painted a thick vertical stripe on each nail with Barry M Matt White. After this, I used Konad Black and a fine nail art brush for the pattern. Lastly, I used a dotting tool and nail polishes in various colours for the dots. I painted over with top coat.
I must confess that when I first saw tribal art nails on the internet, I was silly enough to think they would be easier to do than other patterns/techniques. But I learnt the hard way that its a little bit trickier to free hand symmetrical lines and dots than it looks!
Sunday, 15 September 2013
31DC2013: Day Fifteen - Delicate Print
For this manicure, I painted my nails with Sally Hansen Green Tea. Then I sponged it very lightly with Rimmel 830 Camoflouge, Sally Hansen Insta Dri Chartreuse Chase & NYC Lexington Yellow. I wanted to create a lightly dappled yellow-green effect. It turned out quite subtle and I don't think the photos managed to capture it really but I quite liked it! I then stamped with Sally Hansen Insta Dri Jumpin Jade and the Gals Fairy GA31 image plate. Here's another look ...
Saturday, 14 September 2013
31DC2013: Day Fourteen - Flowers
I really liked the flowers I did for my Blue Nails for Day Five. So when it came to this challenge, I decided to revisit that manicure but I thought I would look around for some tutorials to see if I could refine my technique. There are some great tutorials for one stroke flower nail art. I was inspired by two such videos: One Stroke Flower Nail Tutorial and Simple, Easy One-Stroke Pretty Flower Painting Nail Art Tutorial
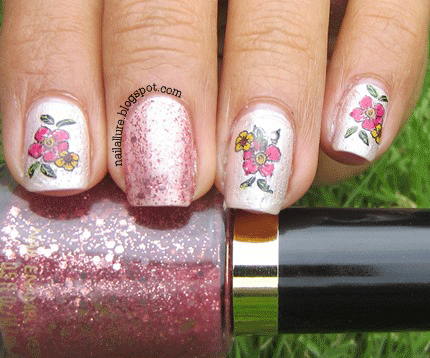
For this manicure, I used Barry M Gelly in Lychee. Then I painted the petals with Sally Hansen Insta Dri Quick Brick and Chartreuse Chase, with a nail art brush. I added 3-4 hexagonal nail glitters from the Born Pretty store to each half flower and finished with top coat. I absolutely love free hand floral nails like these and hope to do more of them in the future!
Although originally, for the Flowers challenge, I had planned on doing stamping decals. I painted some squares of top coat onto a plastic bag and waited for it to dry. Then I stamped a flower image onto each of these. After this, I filled out the flowers and leaves with different colours with a fine nail art brush. Waited for it all to dry, peeled them off with a pair of tweezers and applied to my nails with topcoat.
The decals came out quite well but I think I used too thick a layer of top coat on the plastic bag. When I applied the decals to my nails and added more top coat, it bubbled up quite badly.
So I thought I would do these free hand flowers instead...
For this manicure, I used Barry M Gelly in Lychee. Then I painted the petals with Sally Hansen Insta Dri Quick Brick and Chartreuse Chase, with a nail art brush. I added 3-4 hexagonal nail glitters from the Born Pretty store to each half flower and finished with top coat. I absolutely love free hand floral nails like these and hope to do more of them in the future!
Although originally, for the Flowers challenge, I had planned on doing stamping decals. I painted some squares of top coat onto a plastic bag and waited for it to dry. Then I stamped a flower image onto each of these. After this, I filled out the flowers and leaves with different colours with a fine nail art brush. Waited for it all to dry, peeled them off with a pair of tweezers and applied to my nails with topcoat.
The decals came out quite well but I think I used too thick a layer of top coat on the plastic bag. When I applied the decals to my nails and added more top coat, it bubbled up quite badly.
So I thought I would do these free hand flowers instead...
Friday, 13 September 2013
31DC2013: Day Thirteen - Animal Print
I wanted to do a snakeskin print for the animal print nails. But I don't have an image plate that has this image. So I looked around at some of the wonderful tutorials on the internet and found this one that I really liked - "How To Snake Skin Your Nails Tutorial"
I got some net fabric and some tulle from a fabric shop for under a pound for this and its enough to last me for snakeskin nails for many years!
I painted my nails with Sally Hansen Xtreme Wear Wet Cement. After they were dry, I wrapped each nail with the net fabric and sponged with a light purple, Precision Nail Lacquer Purple Rain. After this I wrapped each nail with the fine tulle and sponged with Sally Hansen Insta Dri Grape Escape.
I really liked the results this technique produced and look forward to using it again sometime!
Thursday, 12 September 2013
31DC2013: Day Twelve - Stripes
This manicure is easy to do and I was surprised at how good it looked - it came out better than I expected! The stripes look a little uneven in this extreme close-up but it wasn't noticeable in real life. This was done freehand. I first painted my nails with Barry M Cyan Blue and then drew on the stripes with the Barry M nail art pens in black and silver. In the end, added the rhinestones and finished it off with topcoat.
I have always loved nail art but never really tried to do much earlier because I thought it might be too difficult. That is until I discovered nail art stamping. I still love stamping - you can get amazing nails with that but with this challenge, I have tried so many other nail art techniques, including free hand. And I have realised that some of them are not that hard and don't need a lot of special equipment. Its just a matter of starting somewhere! And something like some stripes or dots or some rhinestones can really make your nails look fabulous and make a nice change from plain painted nails. If you have never tried nail art and don't really have many tools for it, then something like this might just be the one to start off with!
Subscribe to:
Posts (Atom)


.jpg)