Showing posts with label Blue. Show all posts
Thursday, 21 May 2015
Tuesday, 10 March 2015
Saturday, 28 February 2015
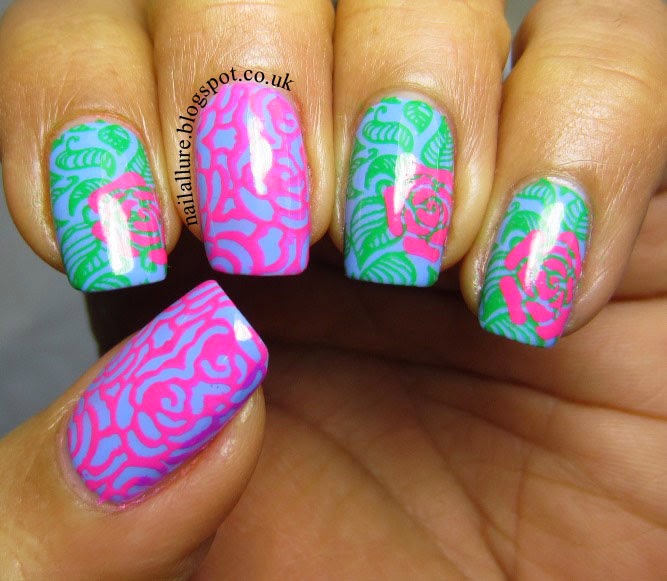
Pink Flowers!
I was really looking forward to using a couple of the Models Own Chrome polishes I got to stamp with, and they did not disappoint. I have used one of them here for the stamping. Also, I really wanted to try out the floral image on the BP 54 plate - I haven't used such a large floral image before and it looks very unusual and eye-catching, I think.
Labels:
Blue,
Born Pretty,
BP43,
BP54,
Konad,
Model's Own,
Pink,
Revlon,
Stamping
Sunday, 22 February 2015
Colourful Leadlight Stamping Manicure
I got some of these Born Pretty Stamping plates specifically for Leadlight manicures, where you colour in the stamping with other polishes for a colourful end result. This is just one such manicure.
I have used a very pretty white polish with a gold shimmer for the base and the pink and blue polishes also have fine glitter in them. I don't know if my photos do justice to this shimmery gorgeousness but I did so enjoy wearing these nails!
Labels:
Blue,
Born Pretty,
BP-L002,
Konad,
LA Colors,
Lead Light Technique,
Nicole by OPI,
OPI,
Pink,
Stamping,
White
Tuesday, 27 January 2015
Sunday, 18 January 2015
The Ocean and a Mermaid!
Labels:
Blue,
Born Pretty,
BP-23,
Color Club,
Essie,
Mundo de Uñas,
Orly,
Silver,
Stamping
Wednesday, 7 January 2015
The Last of the Festive Nails!
I have two manicures today - one that was done for Christmas in 2014 and the other for New Year's Eve. First up is the Christmas manicure, which I did with a new Born Pretty Stamping Plate. The Born Pretty store has recently released a range of new stamping plates which have really pretty images and stamp very well. The Stamping plate for this manicure is the BP01. The stamping polish is Essie No Place Like Chrome on a base of Zoya Dream. I used a dotting tool to depict the snow around the reindeers.
The second manicure I wore for the New Year's Eve's celebration. I chose the colour teal to match a teal and black lace dress that I wore and used the lace image on the index and little fingers to depict that. I used the gold for stamping though, since black didn't show up very well on the teal.
The sparkly base for these nails is one Coat of Sally Hansen Lustre Shine Scarab topped with two coats of Sally Hansen Triple Shine 360 Sparkling Water. The images are from the MoYou London plates from the Festive Collection - 05 and the Bridal Collection - 07. The stamping polish is Mentality Shirin.
The second manicure I wore for the New Year's Eve's celebration. I chose the colour teal to match a teal and black lace dress that I wore and used the lace image on the index and little fingers to depict that. I used the gold for stamping though, since black didn't show up very well on the teal.
The sparkly base for these nails is one Coat of Sally Hansen Lustre Shine Scarab topped with two coats of Sally Hansen Triple Shine 360 Sparkling Water. The images are from the MoYou London plates from the Festive Collection - 05 and the Bridal Collection - 07. The stamping polish is Mentality Shirin.
Friday, 23 May 2014
Guest Post at Life in Lacquer - Pink Butterflies Stamped Manicure
Thursday, 20 March 2014
Ruffle French Tip Manicure - GOT Polish
The prompt for the GOT Polish Challenge is the Ruffle Manicure. For this manicure, you just need to use a large dotting tool to create a line of dots on your nails. Then follow it up with successive lines of slightly overlapping dotted lines in a different colour. The end result looks like fabric ruffles. There's a good tutorial on Chalkboard Nails.
I thought it would be nice to use the ruffle nail art as an accent and french tips rather than the whole nail so this is what I did.
Its a pretty simple technique and the end result is very cute and colourful. This is my first attempt at this kind of nail art. I painted my nails with China Glaze For Audrey. And I did the ruffles with Sally Hansen Insta Dri Flashy Fuschia and Revlon Gold Coin.
I thought it would be nice to use the ruffle nail art as an accent and french tips rather than the whole nail so this is what I did.
Its a pretty simple technique and the end result is very cute and colourful. This is my first attempt at this kind of nail art. I painted my nails with China Glaze For Audrey. And I did the ruffles with Sally Hansen Insta Dri Flashy Fuschia and Revlon Gold Coin.
Subscribe to:
Posts (Atom)