Thursday 29 August 2013

Starlit Half Moons.


Nail Polish used: Sally Hansen Salon Manicure Green Tea and Revlon Colorstay Provence. 

My first attempt at a half moon manicure. I painted the entire nail with the Green Tea and let it dry. When dry, taped off the section near the cuticle with French manicure guides and painted the second colour on the nail. Then added the rhinestones. I believe a lot of people use the paper hole reinforcers instead of the french manicure guides. I think I will have to try that the next time I try this manicure. 

Tuesday 27 August 2013

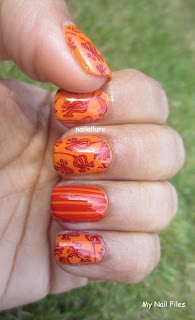
Liquid sand and two toned stamping

For this look, I used:
Base Polish: Bourjois 10 days No chips No 15
Accent Nail: OPI Liquid Sand Get Your Number
Stamping Polish: Barry M Gelly Guava and Plum
Image Plate: Konad M94

I did this manicure last night and nothing seemed to work! I had thought of using a dotting tool to create cute little flowers on one nail but I didn't like how they looked so I re-painted that nail. Then I tried a gradient and didn't like how that looked. In the end I settled for a two toned stamp with the M94 plate.


For the two toned stamp, I painted alternate lines on the image on the stamping plate with the Guava and the Plum, scraped parallel to those lines so that the colours don't mix and then stamped the result onto my nails.

I never thought I would like a textured nail but I love the OPI Liquid Sand Polishes. They manage to look matte and sparkly at the same time. And they are easier to remove then glitters though of course, more difficult than a creme.

Sunday 25 August 2013

Nude, black and gold


For this manicure, I used:
Base Polish: Leighton Denny Meet me in Monaco
Accent Nail: Revlon Gold Coin and Revlon Sequins
Stamping Polish: Konad Black
Image Plate: Konad M57

M57 is one of the image plates that I really like but I think I am going to look for another for the leopard print next time - or free hand it - I am not happy with how the leopard print stamped here. Maybe I just liked this image plate a lot when I first started stamping and now that I have tried so many other wonderful plates, it doesn't seem all that amazing anymore! Although I still do like all the other images on it.

Love the black rhinestones on my ring finger - I think I'm going to be using these or similar a lot more in my manicures now.

Friday 23 August 2013

Denim and Lace

For this manicure, I used:
Base Polish: Rimmel Pro 925 My Denim
Stamping Polish: Konad White
Image Plates: Pueen 27 and Konad M57

Love the blue and white and the denim and lace combos!

Wednesday 21 August 2013

Coppery Butterfly Wings


For the butterfly wings, I used:
Base Polish: Model's Own Copper Pot
Stamping Polish: Konad Black
Image Plate: Nailz Craze NC01
I used a dotting tool and Konad white for the white dots.

I really like the colour of the Model's Own Copper Pot but the formula is quite thin. You can get away with two coats if you stamp on top but if you were to wear it on your own, you would need three coats, in my opinion.

I love this butterfly wings stamps - it just makes your nails look so dressed up and gorgeous.
Thanks for reading!

Monday 19 August 2013

Flowers and Stripes

For this Summery Floral manicure, I used:
Base and Top Coats - OPI and Seche Vite
Base Polish - Barry M Gelly Mango
Stamping Polish - Sally Hansen Insta Dri Wined Up
Stamping plate - GA36 from the Gals Fairy Set
On the ring finger, I used striping tape, painted on top with Bourjois 10 days no chips No 11.

For the accent nail, after painting the base polish and once it was dry, I sectioned it off with pieces of nail striping tape. Then I painted the second colour on top and then immediately removed the tape. Finished it off with top coat.

I love the colours - they are so summery! And I think the flowers are very pretty - the Gals Fairy image plate set has quite a few floral patterns. This was my first experience with the striping tape and I do think, that I need more practice!


Saturday 17 August 2013

Sakura Nail Art

For this Sakura (Cherry Blossoms) manicure, I used:
Top and Base Coat - OPI Nail Envy and Seche Vite
Base Polish - Sally Hansen Salon Manicure Green Tea
Stamping Polish - Konad Black
Stamping Plate MoYou Suki Collection 01
I also used the pink Barry M Nail Art pen for the petals.

Isn't this nail art stamping plate gorgeous?


The base polish is so aptly named for this manicure - green tea! When I think of Japan, that's what I think of - the elegant tea ceremony, the blossom laden cherry trees and the beautiful Shinto Shrines and Buddhist Temples. Its definitely one of my dream destinations - I hope I get to visit one day soon!

Thursday 15 August 2013

Happy Indian Independence Day!

This manicure is to wish all my Indian Friends a very Happy Independence Day on the 15th of August 2013!
I used the the tricolour - the Indian Flag on three nails and a peacock feather and the lotus flower on a nail each as they are the National Bird and National Flower of India. 

For this manicure, I used: 
Base and Top Coat - OPI Nail Envy and Seche Vite
Base Polish - Essie Bonds Beige, Cutex Orange Spritz, Rimmel 60 Seconds 830 Camouflage
Stamping Polish - Konad Black and Essie Penny Talk
Plates used - Konad M55, M66 and Nailz Craze NC01

For the nails with the flags, I painted the entire nail first with Essie Bonds Beige and then used nail striping tape to mark it into three sections before painting with the orange and green. 
I wasn't too happy with the Essie Bonds Beige - its a very thin formula - takes at least three coats to get some colour on to your nail and then takes forever to dry - even after going over the top with the Seche Vite Dry Fast Topcoat. I had to do one of the nails three times because the Essie Bonds Beige wasn't as dry as I thought and got messed up when I put the striping tape on!!

Thanks for reading!

Tuesday 13 August 2013

Silver stamping on a multi-coloured base.

I used:
Base and Top Coat - OPI Nail Envy and Seche Vite
For the base - China Glaze Holographic Infra Red, Strap on Your Moonboots, When Stars Collide and OMG a UFO
Stamping Plate - MoYou Suki Collection Plate 01
Stamping Polish - Essie No Place Like Chrome

I painted diagonal stripes with the base polishes and then stamped on top.

First Post!

Welcome to my blog!

I decided to set up this blog to document my adventures with nail polish and nail art.

I have always loved nail polish. Since my teens, I have painted my nails almost weekly, pretty regularly. That is, until the time, I got pregnant with my son! Then for almost 4 years, I lived with bare nails (other than the occasional toenail polish in the summer) and thought that nail polish was definitely one of the things of the past - like night outs  or lounging around all day with a book - you know, just some of the things you give up for your little bundle of joy! Who has the time to sit around for three hours waiting for your nail polish to dry, when you are a Mum?!

Then when my son was about three years old and I had a bit more time, I tried painting my nails again and discovered that nail polish had changed in the few years that I missed out on. There were so many fast dry formulas available which didn't need waiting for ages to dry! And then I also came across many wonderful nail blogs and discovered fast drying topcoats like Seche Vite!

On these nail blogs, I also came across beautiful nail art, including stamping! It just seemed so pretty and perfect - I didn't think I could pull off all the wonderful designs. But finally, I decided to buy one small Konad stamping kit from Amazon to try. And there was no looking back!

I am still experimenting with stamping and nail art, still learning from all the wonderful nail blogs out there. But I wanted to share my experiences with other people who think, like me, that some nail polish and nail art brings a little bit of happiness into your life!

Thanks for reading!